Recording a macro in Excel VBA is a very very useful tool. Why we use this tool to record a macro?
Reason is very simple that if we are doing the same task in Excel and again and again, then macro recorder comes in existence. We use macro recorder for reducing time taken in our daily task.
By the below given image we will understand macro recording step by step:-
Open the Excel and go to Developer tab and click on it.
Image 1
And then click on the Record Macro and following image will appear
Image 2
Once you click on the "OK" button in above image then macro will record everything, whatever action or step you will do in excel.
Main thing about macro recording is that it will record every single step, we will take. So my suggestion is plan first to record macro and then record it and if you will not make a plan and start recording, it will record unnecessary step also.
Below is the details about above circled number in macro recorder box.
1. Macro Name
Macro name box where we can type the name of our macro, the first character of macro must be a letter and macro name can not have a space like "My first macro", it should be "My_first_macro" and macro names are not case sensitive.
2.Assign Shortcut Key
In serial no. 2 we have to give a shortcut key for when we run the macro by key, we simply press the shortcut key and macro will run.
3. Store macro in
Third no. is store macro in, there is a drop down list. and we need to select the file from "Personal Macro Workbook, "New Workbook", and "This Workbook".
This Workbook.
Save the macro in the current workbook, we are working with and macro will work on that file only.
New Workbook
Create macros that you can run in any new workbooks.
Personal Macro Workbook
We will choose this option if we want the run macro in every file we will work, it does not matter on whatever file we are working.
4. Description Box
In this box we will type the description about the macro that for what purpose the macro is created but this is optional not necessary.
Please the see the below of "Macro Recorder Box" image of figure entered.
And now simply click on "OK"
Once you click "OK" then we will see that the record button will changes into "Stop
Recording" button, this means now Excel has started record our steps and when our step for macro recording is finished then we simply click on this "Stop Recording" button and macro is recorded successfully.
Recording" button, this means now Excel has started record our steps and when our step for macro recording is finished then we simply click on this "Stop Recording" button and macro is recorded successfully.
Simply I did something in excel for "Record a Macro" in below image :-
Image 4
I type "a" in cell "C5" and "b" in cell "C7" and click on Stop Recording button, and see how a macro recorder record a macro in below image:-
Image 5
First it type the Macro name " Sub Macro4 ()" and then record below mention thing like, first it select cell "C5" and then type "a" and then select cell "C7" and type "b" and then select cell "C8" and then I stop recording by pressing "Stop Recording Button" as appearing in the below image.
Image 6
And once we press stop recording button the macro recorder has finished its job, macro recording is done.
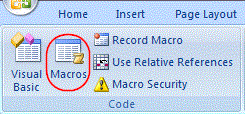
Now if we want to check our macro, simply go to Developer tab --> Macro and click on the "Macro" button
Image 7
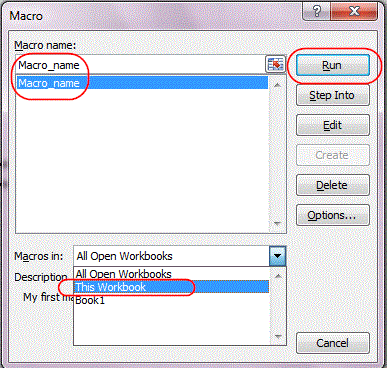
Once you click on the "Macro" button, the following image will appear
Image 8
We will see that macro name, we put "Macro_name" and below "Macro in" means will work on the, the workbook we selected that time when we record the macro, select "This Workbook" and press "Run" button the will get the following image
Image 9
Both the figure comes automatically in the cell "C5" and "C7" and another way to run this macro is simply type "Ctrl+Shift+L" because we have given a shortcut name to our macro. See Image 3.
And we will get the same result. try this...
This is the tutorial about "How to Record a Macro in Excel". and I will come soon about a new topic.
Regards
NarendrasExceltips.blogspot.com


No comments:
Post a Comment