Showing posts with label Formula. Show all posts

Monday, 29 May 2017

Excel Match Function


Match Function

In this tutorial we will learn about Match Function in Excel with some example and we will also learn a more about how this function works when we combine this function with Vlookup and Match.

Basically Match Function searches for a specified item in a range of cells and then returns the relative position of that item in the range.

So lets start with the following example:-
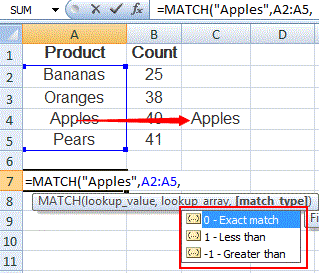
Image 01

In this image we can see that this is a table which contain Column A "Product" and in Column B "Count" and in Column C there is a product name from the product list "Apples". The use of Match Function is to find the position of "Apples" in the list and in this list the position of "Apples"  is "3".

Now we will learn by break the argument of Match Function as follows :-

Syntax

MATCH(lookup_value, lookup_array, [match_type])

The MATCH function syntax has the following arguments:

lookup_value - The value to match in lookup_array.

lookup_array - The range of cells being searched.

match_type    -  Optional. The number -1, 0 or 1. The match_type argument specifies how Excel matches lookup_value with values in lookup_array. The default value for this argument is 1.


If Match_type is 1, [Match finds the largest value that is less than or equal to lookup_value and it requires sorting the lookup_array in ascending order, i.e. from small to large or from A to Z.]


If Match_type is 0, [Match finds the first value exactly equal to lookup_value  and lookup_array argument can be in any order.]

If match_type is -1 [Match finds the smallest value that is greater than or equal to lookup_value. The lookup_array must be sorted in descending order.]


  1. Match returns the position of the matched value within lookup_array.
  2. Match returns the #N/A error if no match is found.
  3. Match is not case-sensitive.

If the lookup_array contains several occurrences of the lookup_value, the position of the first value will be returned.

We can understand this a little by the following example :-

Image 02

In the above image we put all three kind of formula (1,0,-1)

In the 1st formula, lookup_value is "35" but in the Column B there is no value appearing as "35", so in this formula we put match_type "1" because it will return a position of nearest and below of  value "35" and the position is 2nd, i.e. below "35", "34" is the nearest and below "35" value. So the  result is "2"

In the 2nd formula, lookup_value is "34" and Column B has the value "34" so we put match_type "0", and it gives us position of "34" is  2nd. So the result is "2".

In the 3rd formula, lookup_value is "52" and which exist in Column B but when we put  match_type (-1)  the result is  #N/A, The reason is #N/A is because as per the rule if the match_type "-1" then we have to sort the range in the form of descending order, so once we descending  the Column B then see what will be position of "52" 

Image 03

The position of "52" in count column in "1" and now we will learn formula combination with Match function.

Match Function with Vlookup


Following example is the best example to know that what is the use of Match Function with Vlookup.
Cell "G2" has a Vlookup formula which is showing in the  upper formula bar.

Here we can see that this is a simple Vlookup formula which returns a "Unit Price". Now we want to know that if we insert a new column between "Product Name" and "Unit Price" in this table, so will this effect to our result ?

Image 04


Lets understand in a new image :-

Now what we will do just insert a new column between Column A and Column B and see what will happen with the result "Unit Price" see the image below :-

Image 05

Here we can see that when we insert a new columns between Column A and Column B, the result of "Unit Price" have been change to "Exotic Liquids" form "19" as appearing in above "image 04" and which is not correct. So how to get the correct result.

Now in this situation "Match Function" comes in rescue.

Now we will combibe the the Match Function with Vlookup and then see what happened :-


Image 06
 
This image is the same as "image no 04" but in this image we get the result with the help of Vlookup and Match,  we can see the formula bar the formula is loaded by "Match Function". We have seen that there is no change in the result. It is same as we get by the single Vlookup.

Now we will do the same practical as we did in previous image to insert a new column bewtwee Column A and Column B and see what happen :-

Image 07
Now in this image we can see that we added a column "Supplier" between Column A and Column B. But after addition a new column we can see that there is no change on result, it is as before. So match function does not care about delete or add new column.

Now it is clear that the role of Match Function is to look for the matching figure and in this table Match Function search for Unit Price from the list A1:E1, and it does not matter that how many column we add or delete. The formula will produce the result accurately without any cell or column change or change in result.

Now this is clear that if Vlookup and Match function will work together, it will produce the dynamic result and one another benefit is that it prevents from error.

I hope this post has helped you understand how the Vlookup and Match function work together and produce a dynamic result.


Regards 

NarendrasExcelTips.Blogspot.com

Sunday, 28 May 2017

Index Function


     Today we will learn about Index Function in Excel. Index Function in Excel is one of the most useful function. When we combine this function with another function like Match etc, it will produce the dynamic result.

The INDEX function returns a value or the reference to a value from within a table or range.

In the below image we can see the Index function has two different formula like :-

1.   Index (Array, Row_num,[Col_num]

2. Index (Reference, Row_num,[col_num],[area_num]

In the first formula it is Array and in the second function in place array it is Reference.

We will give separate example for both of the format.

Array form


We can see that some values are in the bracket like [column_num] and in second function [column_num] and [area_num].  i.e. if these values does not exist then we will consider these values as "0" and the function will produce the result by without these values.


Image 1

We will understand the use of Index Function in Excel by following example

Example 1.


Image 2


In the above image when we put the Index Formula such as:- = index(A2:E10,5,4)

In this example we can see the Index Function parameters like (Array, row_num, col_num)

Where  Array is                (A2:E10),
Row_num      is                     5
Col_num        is                     4

Simply the pure explanation is we want the result from area A2:E10, where Row_num is "5" and Col_num "4" and simply answer is "13". We can see red circled, the above image is the intersection of the Row_num and Col_num.

Example 2.

Image 3


In this example we can see the range is (A2:C11) where row_num is "6" and column_num is "3"
Result is from range (A2:C11),row_num(6),column_num(3)= "1943"

In range (A2:C11) intersection of row_num=6, and column_num=3 is "1943"


Example 3.

In the below given example, we can see that row_num and col_num  has the cell reference like:- "D2=Row_num" and "D3=Col_num"


Image 4
In this example if we change the "row_num" and "col_num" according to need then we do not need to change the formula, it will produce the result automatically, "Just try it" because in this example "row_num" and "col_num" are cell reference. So we can change the value.


Reference form

In the second part of Index Function, the first parameter is reference, which is supplied as a reference to one or more cell range. The syntax of reference is :

Index (reference, Row_num.[col_num],[area_num]

Where [col_num] and [area_num] is optional

See the following example to know it better :


Image 5

=INDEX((A2:C5,A7:C10),2,2,1)

In this image we can see that the whole range is divided in two section such as "A2:C5" and "A7:C10"  then come to "row_num" (2) and column_num(2) the and the last section is "area_num"
which is the important in this example. "Area_num" is telling to us that the figure we are looking for, is in which area, whether it is area_num =1 ("A2:C5")  or area_num =2 ("A7:C10")

In the above example if we put "2" in the area_num the result would be "Vaucheron & Constantin 18K" but if we put "1" in the area_num then result would be different i. e. "Cartier Tank 18K"

In our further tutorial we will learn to combine the Index Function with the other function like "Match", "Count" and will see that what kind of the result we will get.


Regards

NarendrasExcelTips.blogspot.com

Saturday, 24 December 2016

Vlookup formula for multiple columns

  Hi friends,
            Today we learn about how Vlookup can retrieve the value of  multiple columns from a single 

formula.


Lets learn the matter with the following example :


We have a table above with Name in column A and East, West, North, South in the row 1 field and 

table has some random data within the table range from A1:E7.

Now to understand the example in a better way we have to draw a second table with no data, is 

mentioned below:

Now we have a blank table and this table has no data and with the help of given data in Table1 there 

is one way we are familiar with i.e. simply type formula =VLOOKUP(H1,A1:E7,2,FALSE) but  
this formula is basic formula and to look for each record we have to type the formula every single 

time, but today we will discuss about a single formula to drag all the cell result.


So here is another table to understand it in better way.
I have typed the formula above and described it below


1.       Lookup_Value      :  We are looking the value of H1 in column I1 from Table1

1.       Table_array          :  We will the find the value of this cell from  table range $A$1:$E$7 (Table1)

1.       Col_Index_num   :  Now this is the main field column, we will look for the value of each column
    
                                               by typing the vlookup  formula in each column, but by the help of vlookup columns
                                           
                                               formula we do not need to type the vlookup formula each time, we will                                                  
                                       understand it from above mentioned example(Table3).
      
        False                   :  And the last argument is True/False(Approximate/Exactly)


In the above mentioned example you are watching that there are $ sign in the formula, this $ has a 

important role in formula writing in Excel and we can put this $ by pressing F4 key repeatedly to get

 the result accordingly. This $ sign fixing a row or column i.e. $H1 (H: Column, 1: Row), 

$H1  column  (H) will be freeze and will not change but row 1will change whenever we will drag it 

right  or down.

So if you will exactly type the above formula in the table and press Enter, it will retrieve all data from  
Table1, all fields will get their data automatically.


I  will give a separate post for Absolute Cell Reference  later 

Now focus on third arguments i.e. Col_index_num COLUMNS($B1:B1)+1

Here is the detailed description $B1:B1 represents the same column but  when  you drag it first $B 

will be  remain same and second B will be change to C, D, E, F and so on and after closing the 

bracket type +1 and it will automatically look for the next column, you can see by deleting the +1 

from the formula and see then what happened. 

So friends , soon I will be back with another useful post 

goodbye for now


Narendra


Monday, 1 August 2016

The Vlookup Guide

    
      Today we will discussed about the most useful topic of advance excel, so for us it is necessary to know that how to use this function and why this function is so much useful.

First we will understand that what is vlookup and why this is so important so first we will put a little 

look what is vlookup.

VLOOKUP, V stands for "vertical" which mean use VLOOKUP to lookup values in table that's 

arranged vertically. And the same for Hlookup stands for “Horizontal” but we will discuss that in later.

                         VLOOKUP (Lookup_value, table_array, col_index, [range_lookup])
                                                    (1)                     (2)             (3)                   (4)

(1)    Lookup_value          The value to look for in the first column of a table
(2)    table_array               The table from which to retrieve a value.
(3)    col_index_num       The column in the table from which to retrieve a value.

(4)    range_lookup           [optional] TRUE = approximate match (default). FALSE = exact match.

Here is the example:-


Here we will discuss about one by one but for the clarity we need one table to understand the picture clearly.


Here in this above image we can see that row no 3 is highlighted, suppose that  we have only cell value “George” in cell A3 and we have to look for the cost of “George”or we need to find the value of “Profit” of “George” so in this case we can use vlookup and after using vlookup we can get the value easily. How to find the value of “George”  in the column of “Cost” or “Profit”, see how it happens :- 


Simply type =Vlookup(1,2,3,4)

                    =Vlookup (lookup-value{ we are looking for},table-array{total table area from A1 to D9},col-index{in which column we the value is exist},[range-lookup]{iether we want exact value or near about}               
Now we need to put the value in the above format
       =Vlookup(A13,A1:D9,3,False)

      A13      =we are looking for “George” value in cost column so “George” is located in cell A13.

      A1:D9  =total table area, we can easily seen that total  data is from cell A1:D9
     
      3          = 3 is the column no. where my value is located

True/False =    and last argument is True/False which means either we want the value exactly or near about will do.      


After putting these value into the formula and press enter, you will get the result that “George” gave “7412” value in column 3 and if in the formula we will change column no. “4” instead of “3” you will get the result  from 4th  column i.e. = 12025 the value of “George” is located in column no. “4“


Limitations of Vlookup

Vlookup has some limitation and in the following example we will discuss about it.

1.        Vlookup will always look for the data from extreme left to right, not from mid to right , in the below given image  vlookup will find the data from Column A to Column D not form Column B to Column C  or Column D. 


We can understand it from below given example :-

 We have cut a piece form above image to understand this better way and in this below given screenshot we can  see that column (H) and column (I) are blank but we can find the value for both the places.


By the vlookup formula if we want to look for the value for H2 and I2 the formula would be

=Vlookup(F2,Table array would be (A1 to D9), column no would be 3 or 4, and last step  is True/False)

True stand for = Match nearest value
False stand for = Match exact value

I want to say from this example we cannot find the result by putting the below given example

=Vlookup(G2,Table array would be (A1 to D9), column no would be 3 or 4, and last step  is True/False)
=Vlookup(G2, A1 : D9, 3 or 4, False)

If we are applying this formula so we have to take notice that when we will look for G2 so the table array would be B2:D9 not by A1:D9 if we follow this the result will be come out because in this case column B2 would be extreme left.

2.   Vlookup will not look for the data from right to left, example below :-

You can see in the below given image the limitation of vlookup that it cannot look the data from right to left.

3.      If we have applied vlookup formula somewhere and we will insert another column in the table array field so everywhere we have applied vlookup formula (only those formulas which has the base from that table array field) all the formula will not produce the correct result because vlookup will count the column no. and then give the result but if we insert another column in the table array field the result would not  be the same.      


In the below given image we can see that when we insert a column before the Sales column the result is not the same and now it is a blank cell. Here above in formula bar you can see that the formula is same as it is appearing in the above image but in above image the value appeared after vlookup formula applied but in the below given image the value is not appearing but the formula is same to same, only difference is we have inserted a column before sales column.


So all this is happening because vlookup has a limit that if we insert a column between the table array it will not produce the same result.


So all these are the limitation of vlookup we have solution for the same also, like if column inserted so we have the solution, even how vlookup goes to left. 

All we will discuss in the  future tutorial.

Till then

Good bye

Narendra 

Featured post

Pivot Tables

Pivot Tables are one of the most useful tool in excel, and most excel experts says that this tool is the magic tool for quickly prepar...