Today in this tutorial we will learn about protecting our Excel file by putting a password in it. by doing this will keep our documents safe and secure.
"Caution: If you lose or forget the password, it cannot be recovered. It advisable to keep a list of passwords and their corresponding workbook ans sheet name in a safe place (Remember that passwords are case-sensitive.)"
There are two ways to put password in the documents :-
1. Password to Open
2. Password to Modify (Open with Read Only)
We will learn about each of these topic one by one.1. Password to Open
When we put password in Excel by this way then nobody can open the password protected file without putting correct password in it. With the help following image, we will learn how to do this.
Suppose we have a Excel data file and we want to make this file as password protected. So to do that we have to follow the simple step as given below.
Go to Office button in office 2007 and click and then click on "Save As"
Go to Office button in office 2007 and click and then click on "Save As"
 |
Image 01 |
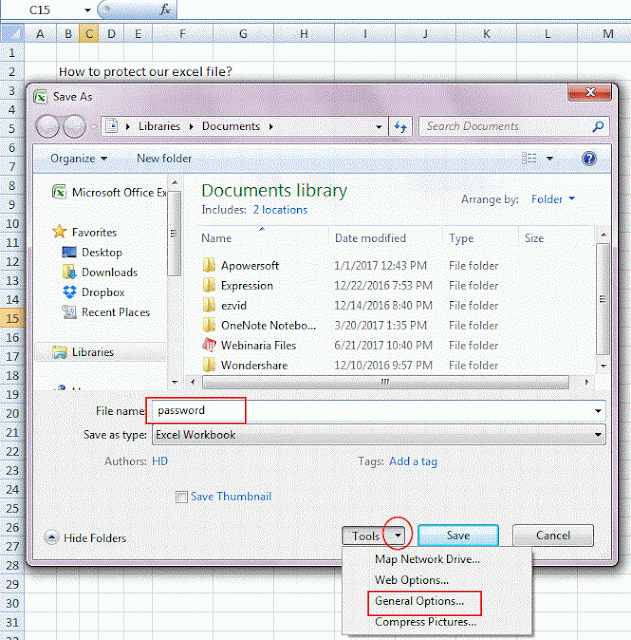
Once we click on "Save As" button, we will get the following image of saving the document.
 |
Image 02 |
We have put the name of the file as "password" and then click on the tools button given below red circled, click on the drop down and we will get the four other options.
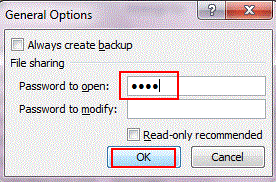
Click on the "General Options" button and we will get the following image.
 |
| Image 03 |
1. Password to Open
We use this option when we want that nobody can even open our document and can't see it.
Simply put the password in the 1st "Password to Open" and press "Enter".
 |
Image 04 |
We will get the below given image for asking us to put password again. Remember that we do not need to put password in the "Image 03" on both the field i.e. 1 and 2. 1 is for different use and 2 is for different use.
So after pressing Enter, enter the password again in the given field and simply "OK" and our document is save.
 |
Image 05 |
Now we need to open the document but I want to remind one thing that in the above "Image 04" there is a "Read-only recommended" option is available, so when we check this option the document will open in the two form. 1st is in the "read-only "mode, in this mode we can not modify the data and 2nd option is to open in the normal mode.
When we will open the document, we will get following option to put the password.
 |
Image 06 |
When we will put the correct password in it, it will ask another option to us to open it on "Read-Only" mode or "Normal" mode.
To open this document in the form of "Read-Only" mode, it means, we do not need to change anything in this document else open it into normal mode and can change the data.
 |
Image 07 |
We will open the document in the both of the form "Yes" and "No" . First press "Yes" and see what happens.
Below image when we open the document in the "Yes" form i.e. "read-only" form and want to edit some data, like typing "Hello" and save it. It will not save our data and pop up the following error. The document is showing as "read-only", see top with the file name[Read-Only] appears.
 |
| Image 08 |
Now we will open this document in the form of "No" and see what happens :-
 |
Image 09 |
The file is simply opening in the normal mode and can editing the data also.
2. Password to Modify (Open with Read Only)
Now come to the second option of the protecting the document with "Read-Only" mode.
Follow the instruction as we follow in the above method and reach to "Tools" option and see the below image.
Now in this time put the password in the second filed i.e. "Password to modify" and Enter
 |
| Image 10 |
After pressing the enter we will get the following image and again put the same password in the given field. and press enter and save the document. Now our file is password protected file and no one can see this document but can see as "read-only" mode.
 |
| Image 11 |
Save the document and open it. See below image :-
 |
Image 12 |
Now we have save this document in the of "Read-Only" mode so when somebody open this document it will open in the "Read-Only" mode and anybody can open and see the data but can not edit or save the data without having the password.
How to remove password
Now we will learn to how to remove the password from the password protected file.
We will follow the same way as we entered the password the same way to remove the password from the file.
Go to File Office Button Click and Click Save as button and go to tools and click on drop down and click on General Option and we will get the following image
 |
| Image10 |
Now today we learned, how to make our document as password protected and how to make the secure our data.
We will learn something new in the next tutorial.
Thanks and regards
NarendrasExcelTips.Blogspot.com


No comments:
Post a Comment