Monday, 25 January 2021

How to use ‘With Statements’ in VBA Macro

In this blog post, we will learn about ‘With Statements’ in VBA macro.

Use With Statement, when we need to apply multiple formatting in a single range of the dataset.

Suppose that we have a dataset and we need to apply many formatting by VBA in the dataset.

So we will use the following VBA code to change the following dataset formatting.

Here we will use the below dataset to apply multiple formatting:-


Image-01


In the above dataset, we will apply the following formatting.


We want to change the below formatting:-

-    To change the font size to 16

-    To make the font Bold

-    A font name as Times New Roman

-    Interior color as Green

-    Font color as Yellow

-    Cell border as Continuous


See the below code for the above formatting.


Sub Range_With_Statements()

Range("A1:A10").Font.Bold = True

Range("A1:A10").Font.Size = 16

Range("A1:A10").Font.Name = "Times New Roman"

Range("A1:A10").Interior.Color = vbYellow

Range("A1:A10").Font.Color = vbGreen

Range("A1:A10").Borders.LineStyle = xlContinuous

End Sub


See the image below for the above coding:-


Here in this VBA macro, we are writing a single line for single formatting.

Also notice that we are using the same range (“A1:A10”) for every formatting.

In this situation, we apply the ‘With Statements’ to change the formatting.

‘With Statements’ reduce the length of the code because this will use a range (“A1:A10”) only a single time.


Now we will change the above formatting with the help of ‘With Statements’.

See the below macro to change formatting with ‘With Statement’.

Now we will apply the same formatting with the help of “With Statement”.


See below macro code:-


Sub With_Statements()

            With Range("A1:A10")

                        .Font.Bold = True

                        .Font.Size = 16

                        .Font.Name = "Times New Roman"

                        .Interior.Color = vbYellow

                        .Font.Color = vbGreen

                        .Borders.LineStyle = xlContinuous

            End With

End Sub


See the image below for the above code:-


Here you can see that we are using range (“A1:A10”) in a single time and the rest of the macro coding will remain the same.

Now run the above macro by “F5” or “F8” by step by step execution.

Here you saw that how “With Statement” can reduce the length of macro coding.


Now, I hope that you understand the concept of ‘With Statements’ in VBA macro.

I hope you find this tutorial useful.

Please feel free to put your comments or suggestion in the below-given box.


Thank You

Narendra


Related Post


Easiest Way to Copy and Paste Data in Excel VBA

How to use the MsgBox in Excel VBA

What is Current Region Property in VBA

How to Change or Rename the Sheet Name in Excel VBA

How to Change Sheet Tab Color in Excel VBA

How to Change Font Color in Excel VBA

How to Change the Background Color in Excel VBA

Monday, 18 January 2021

How to Delete Rows and Columns in VBA Macro


In this blog post, you will learn about how to delete rows and columns in VBA macro.

Sometimes, we face the situation when we need to delete some unwanted rows or columns as per our dataset required.

In Excel, we delete the unnecessary rows and columns by selecting the whole rows or whole columns and right-click from the mouse.

Then choose the delete option from the Options pop-up and delete the unnecessary rows and columns.

Suppose we have a dataset (see below image), there is a blank row and a column in it. 

Now we will delete the unwanted empty rows and columns with the help of the VBA macro.


Image-01


How to Delete Unwanted Rows By VBA Macro


Here in the above image, row (4) is blank and unwanted and need to delete from it.

We will use this row number in the VBA macro code.  

We will use the following VBA macro to remove or delete row (4) from the above dataset.


Sub Delete_Rows()

Range("4:4").EntireRow.Delete

'this code will delete row (4)

End Sub


See the image below:-


Image-02


Now execute the above code by pressing F5 or F8 for step by step execution.

Now suppose that we have to delete multiple rows and columns from the dataset then we will use the following VBA macro code:-

Here rows from 4 to 6 are blank and unwanted, which we need to delete or remove.


Sub Delete_Rows()

Range("4:6").EntireRow.Delete

'this code will delete row “4”

End Sub


How to Delete Unwanted Columns By VBA Macro


Now the same way when we want to delete the unwanted column from the dataset, then we will use the below given VBA code:-


Sub Delete_Columns()

Range("C:C").EntireColumn.Delete

'this code will delete the unwanted column

End Sub


See the image below:-


Now run the above VBA macro to delete the unwanted column by pressing F5 or F8 for step by step execution.


Image-03

Once we execute the above VBA code, column (C) will be deleted.

Suppose that we want to delete multiple columns within the dataset, then we need to use the below-given code:-


Sub Delete_Columns()

Range("C:E").EntireColumn.Delete

'this code will delete the unwanted columns

End Sub


When we execute this code by pressing F5 or F8 (for step by step execution), the mentioned columns will be removed.

So I hope you find this tutorial useful.

Please feel free to put your comments or suggestion in the below-given box.


Thanks

Narendra


Related Post For Beginners


Easiest Way to Copy and Paste Data in Excel VBA

How to use the MsgBox in Excel VBA

How to Change the Background Color in Excel VBA

What is Current Region Property in VBA

How to Change Font Color in Excel VBA

How to Change Sheet Tab Color in Excel VBA


Saturday, 16 January 2021

How to Insert Rows and Columns in Excel VBA


In this blog post, you will learn about inserting rows and columns in Excel with the help of VBA.


Inserting Rows and Columns in Excel


Basically, when we insert rows and columns in Excel, we follow the below procedure.

Select the cell or row or column, before which we want to insert a new Row or a Column.

Press Right-click on the cell and select the “Insert” option from the right-click properties and then Excel asks whether to insert rows or columns.


If we want to insert rows then we select rows or if columns then we will select the column option.

But here in this blog post, we are going to learn about inserting rows and columns with the help of VBA.

How to Insert Columns in Excel By VBA


See in the below image, we have a dataset and we are missing one column here which we want to name as “North” and enter the value under this column that belongs to it.

See below:


Image -01

Here, you can see that we have data for the zones, East, West, and South and now we want to insert a new column for zone name "North". Which we will insert with the help of VBA.

So for inserting a new column we will use the following steps in VBA.

Go to the Developer tab in Excel and click “Visual Basic”, click on “Insert” and Click on “Module” for writing a VBA code.

As per the rules, Excel will always insert rows or columns before the current or active column or rows.


Here we want to insert a new column before “C” titled “South”.


Sub Insert_New_Columns()

Range("C:C").Insert

'this code will insert a new column

End Sub


Just execute the above code by pressing “F5” for a single time execution or press “F8” again and again for step by step execution.


See the result below:


See in the above image, a new column inserted, column “C” and pushed our dataset "South" just one column next, i.e. in column “D”.


Here, we inserted a single column but suppose we need to insert multiple columns here, then our VBA code for that will be as follows:


Sub Inset_New_Column()

Range("C:E").Insert

'this will insert 3 (C,D,E) new columns

End Sub


After executing the code, see the image below:


Three columns("C", "D"and "E")  have been inserted within the dataset.


How to Insert Rows Within Dataset by Excel VBA


Now we will insert the rows within the given dataset.

Suppose that we have a dataset where we need to insert single or multiple rows within the dataset, see the code below for single-row insert:


Sub Insert_New_Rows()

Range("4:4").Insert

'this code will insert new row "4".

End Sub


See the result after executing the above code:


This code is made for inserting multiple rows such as 3 or 5 within the dataset. 

See below the VBA code for the above-mentioned result:


Sub Insert_New_Rows()

Range("4:6").Insert

'this code will insert new row "4 to 6".

End Sub


See the result below after executing this VBA code.


So we learned here to insert rows and columns in Excel with the help of VBA.

I hope you find this tutorial helpful.

Please feel free to put your comments and suggestion.


Thanks

Narendra


How to use the MsgBox in Excel VBA

Easiest Way to Copy and Paste Data in Excel VBA


How to Change the Background Color in Excel VBA


What is Current Region Property in VBA


What is Current Region Property in VBA


How to Change Font Color in Excel VBA


Tuesday, 5 January 2021

How to use the MsgBox in Excel VBA


In this blog post, you will learn about MsgBox in Excel VBA Step by Step.

The VBA MsgBox is a dialog box in which you can inform the users about your program.

For example, see the below image:-


Image-01


Use the below VBA code for the above msgbox image:

Sub Basic_Message_Box()

MsgBox "I am the Message Box"

End Sub


The above message box is the 'Default' type message box but we can create different types of message boxes with different button options, you will learn further in this blog post.


Important Note:-

1.    Always use the doubt quote (“ ”), when using text string in the message box.

2.    Do not use the double quote(“ ”) when entering number values

3.    Use (#) when entering a date_value in the message box


Using numeric values in the message box

See the below message box for numeric values


\Image-02


See below VBA code for the above message box.


Sub Message_Box_With_Number_Value()

MsgBox 20000

End Sub


Entering Dates in the Message box


Entering date values in the message box.


Image -03


See the below VBA code for entering date values in the message box


Sub Message_Box_With_Date_Value()

MsgBox #3/1/2021#

End Sub


Here have entered (#) value in the VBA code window but it is not appearing in the message box.

These are the basic use or forms of VBA message box.

We can create different types of message boxes in VBA.


Message box has some parameters, which are as follows:

MsgBox( Prompt [,buttons] [,title] [,helpfile, context] )


prompt -     Required, displayed as the message in the dialog box.  The maximum length  of prompt is approximately 1024 characters, depending on the width of the characters used.

buttons -     [Optional]. That is the sum of values specifying the number and type of buttons to display, the icon style to use, the identity of the default button, and the modality of the message box. If omitted, the default value for the button is zero ("0").

title      -       [Optional], string expression displayed in the title bar of the dialog box. If you omit the title, the application name is placed in the title bar.

helpfile    -   [Optional]. A string expression that identifies the Help file to use to provide context-sensitive help for the dialog box. If a helpfile is provided, the context must also be provided.

context    -   [Optional]. Numeric expression that is the help context number assigned to the appropriate help topic by the help author. If context is provided, a help file must be provided.


Note:  Only the prompt argument is mandatory and rest square brackets arguments are optional. 

Button parameter covers different types of values, below table containing all 

types of button that we can use.

We can use these numeric values for making or creating different types of button

option, in the below list, see the numeric values which are appearing just before 

the button option.

See the list as follows:


No.         VBA Code                              Button Description


0            vbOKOnly                          - Displays OK button only.

1            vbOKCancel                       - Displays OK and Cancel buttons

2            vbAbortRetryIgnore           - Displays Abort, Retry, and Ignore buttons.

3            vbYesNoCancel                  -  Displays Yes, No, and Cancel buttons

4            vbYesNo                             - Displays Yes and No buttons

5            vbRetryCancel                   - Displays Retry and Cancel buttons

16          vbCritical                         - Displays Critical Message icon

32          vbQuestion                      - Displays Warning Query icon.

48          vbExclamation               - Displays Warning Message icon.

64          vbInformation                 - Displays Information Message icon


and more  ...

Now we will use the above number values to create different types of button in 

the message box, one by one.


MsgBox -  vbOkOnly (0) button (Default)

This is the default message box type with only one parameter ‘prompt’ without any optional arguments.

See the default message box image below:


See below, the VBA code for the above message box:


Sub Basic_Message_Box()

MsgBox "I am the Message Box"

End Sub


MsgBox - vbOkCancel (1) – Ok and Cancel Buttons


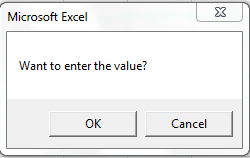
Below message box containing “Ok” and “Cancel” buttons with a prompt message.


See the code below for the above message box:


Sub Message_Box_Ok_Cancel()

MsgBox "Want to enter the value?", vbOKCancel

End Sub


MsgBox - vbAbortRetryIgnore (2) - Abort, Retry, and Ignore Buttons


See below message box for above button option, such as Abort, Retry and

Ignore with prompt parameter.


See the VBA code below for the above box:


Sub Message_Box_Abort_Retry_Ignore()

MsgBox "Want to enter the value?", vbAbortRetryIgnore

End Sub


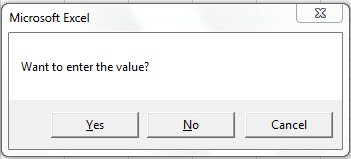
MsgBox – vbYesNoCancel(3) - Yes, No, and Cancel Buttons

This VBA code option will display buttons like Yes, No, and Cancel with ‘Prompt’

Parameter text.


See the message box image below for the above options:


See the VBA code below for the above image:


Sub Message_Box_Yes_No_Cancel()

MsgBox "Want to enter the value?", vbYesNoCancel

End Sub


MsgBox – vbYesNo (4) - Yes and No Buttons


The below image displays only two-button “Yes” and “No”.


See below, the VBA code for the above image:


Sub Message_Box_Yes_No()

MsgBox "Want to enter the value?", vbYesNo

'you can use '4' in place of "vbYesNo

End Sub


MsgBox – vbRetryCancel (5) - Displays Retry and Cancel              Buttons


The above option displays the below message box, with ‘Retry’ and ‘Cancel’ 

button options.


See below, the VBA code for the above message box:


Sub Message_Retry_Cancel()

MsgBox "Want to enter the value?", vbRetryCancel

'you can use '5' in place of "vbRetryCancel

End Sub


MsgBox – vbCritical (16) - Displays Critical Message icon


Below the message box is displaying a ‘Critical’ message icon with ‘prompt’ text message:


And see below the VBA code for the above image:


Sub Message_Critical()

MsgBox "Want to enter the value?", vbCritical

'you also can use '16' in place of "vbCritical

End Sub


MsgBox – vbQuestion(32) - Displays Warning Query icon


The above message box code will display the ‘Warning Query’ sign, see in the

image below.


And see below the VBA code for the above image:


Sub Message_Question()

MsgBox "Want to enter the value?", vbQuestion

'you can use '32' in place of "vbQuestion

End Sub


MsgBox – vbExclamation (48) - Displays Warning Message icon

The above message box button option will display the ‘Exclamation’ sign with 

the ‘Prompt’ text parameter. We can replace “vbExclamation with a number 

value  (48) for the same result.


And see the VBA code for the above image:


Sub Message_Exclamation()

MsgBox "Want to enter the value?", vbExclamation

'you can use '48' in place of "vbExclamation"

End Sub


MsgBox – vbInformation (64) - Displays Information Message icon

The above message box option will display an ‘Information’ sign with the 

‘Prompt’ text parameter:


And see the VBA code for the above message box.


Sub Message_Information()

MsgBox "Want to enter the value?", vbInformation

'you can use '64' in place of "vbInformation"

End Sub


Here we have explained a message box with its multiple options with example.

I hope you find this tutorial useful.

Please feel free to put your comment or suggestion in the comment box below.


Thanks 

Narendra


Related Post


How to Change or Rename the Sheet Name in Excel VBA

What is Current Region Property in VBA

Easiest Way to Copy and Paste Data in Excel VBA

How to Change the Background Color in Excel VBA

How to Change Font Color in Excel VBA


Featured post

Pivot Tables