Saturday, 22 April 2017

Excel VBA Introduction

What is VBA?

VBA is stand for “Visual Basic for Application” and it is a programming language. This is very easy and powerful language and it comes pre-installed with Excel. We use this VBA skill to automate Excel job or task to reduce the time.


VBA is also packaged with other Microsoft application like Word, Outlook and Access

What is a Macro?

Macros are small or long programme design in Excel VBA. In further tutorial we will discuss about macro in a detailed way.

Whenever we create a macro in Excel VBA, it will be started like:-

Sub Topic_we_want_to_create_a_macro
-
-  (in this place we will write some vba coding
-     and we will talk in details about it later posts)
-
End Sub

Here SUB (Short for Subroutine) is collection of lines of VBA coding and that coding is the main part of VBA macro.

But when we open Excel in our computer, the VBA option is not displaying there.


In above given image there is no Developer tab, Developer tab is the option from we can make the VBA option visible.

Follow the below given instruction and get a VBA Developer Tab is visible to the ribbon


In Excel 2007, open Excel and top of the Excel there Office Button (No. 1) click on it and a new window will open and at the bottom click on "Excel Option" (No.2), the following window will appear


First click on No.3 "Popular Tab" and make sure No.4 should be ticked and if it is not-ticked the VBA Developer tab will be disappear from Excel ribbon, so make sure that "Show Developer Tab in the Ribbon" is ticked and simply click on "OK" button. 

And once you done it, the Excel image will look like below image:- 


The "Developer Tab" is now available in the Excel Ribbon and once you click on "Developer Tab"
the another VBA option are also visible there,  like "Visual Basic", "Macro", "Record Macro", "Macro Security" etc are also available in the Excel Ribbon,

What is Macro Security?

Click on the "Macro Security" button as circled in the above image 

First we have to check for "Macro Security Setting" in the following given image:-


Make sure your Macro security setting should be exactly as mentioned in the above image.

What is a macro security setting? we will discuss this in a different blog because this is a detailed study.

How to save a Excel macro file?

Now one more thing need to discuss that whenever we will save a macro contains file, we need to   notice that click on "Save" button and from Option "Save as type" as circled, choose  "Excel Macro-Enabled Workbook", if we will not follow this, the macro is not going to save in our file.


Now working on "Visual Basic" simply click on "Developer Tab" and then click on "Visual Basic Tab" or simply type "Alt + F11"


Once you hit on "Visual Basic Tab" or type "ALT + F11" you will get the following 
image :-


No.1 is the "Project Explorer" all the "Module" will be stored in this project explorer window.

What is Module in Excel VBA?

Module are in which we write our macro programming code and Module are created from Project window as follows:-


For creating a Module Right Click on "VBAProject" and click"Insert" and click "Module".

Following image will appear


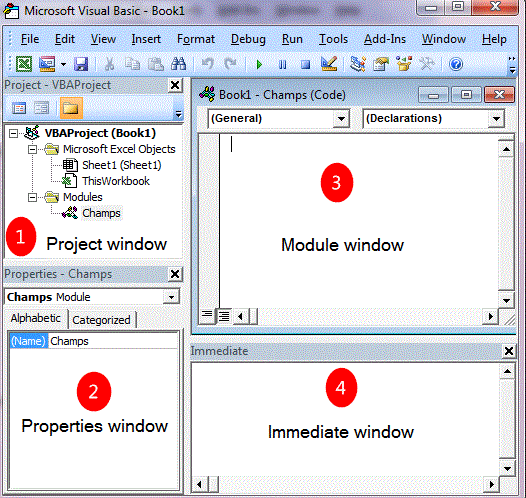
There are another important windows, showing in below image:-


1.  Project window

Project window contains all Module

2. Properties window

Properties window can change the properties of the module, change the name of Module or etc.

3. Module window

We write all the VBA coding in the Module window only

4. Immediate window

Immediate window is very useful and we will discuss about this window in future blogs.

Create My First Macro

First of all go to the Module window and simply type Sub and the name of Macro "My_First_Macro"
and a simple coding " MsgBox "Hello World" 


And run the macro by pressing the Red Circle Button in above image and following outcome will appear


VBA coding create a Msgbox containing a message "Hello World"

So this the First VBA post by "Developer Tab" to create a simple macro. This tutorial shows that there is nothing in complicate in VBA, it is just a simple language but as we will go deeply in VBA we will find some little bit difficulty but if we will not miss any topic then it will benot be so difficult as we think.


Goodbye for now

Narendra

Monday, 17 April 2017

Pivot Table Calculated Field


Pivot Table is so powerful tool in excel that it can calculate a huge excel data with few seconds with 100% accuracy and it has many option to calculate the data the way we want to create the reports. “Calculated Field” and “Calculated Item” are the tool in Pivot Table that we can create our own demanded calculation in a separate column.


Make sure that your cursor is in any cell of Pivot Table


Go to à Optionà FormulaàDropdown arrowà


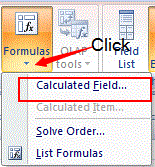
Click on “Calculated Field” and following box will appear, in this box you can see that in the field of “Field” area there are several topics “Region”, ”Product”, ”Customer”, etc. All topics are from our Pivot Table.

With the help of these Field headings we can create more formulas and can get more results with the help of "Calculted Fields" and "Calculted Items" option, and example is given below:-


All the topics in this box are from the below given pivot table 


In this pivot table you can see if we want add a “Profit” column then simply apply the formula of “Calculated Field” à

àOption tabàFormula Tabà Click dropdown arrow àClick "Calculated Field" below box appear

Put the cursor in “Formula” field and “double click on Revenue” – (subtraction sign) “double click on COGS”, the formula should be like =Revenue - COGS, just like the below mention..

And simply click on “Add” button and simply click "OK”


When you click on “OK” our Pivot Table will look like  below given image, a new field of “Profit” is added in the Pivot table and with its calculation “Sum of Profits”


So this is the simple way by adding another field in the pivot table.


And simply click OK then following image will appear


One more complicated example

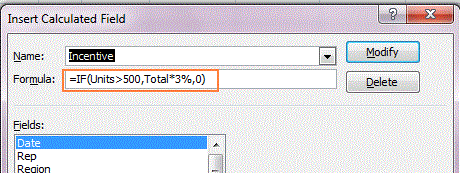
In this below given example we can use  “If” (Logical) conditioned based formula


After click on “OK” button, we will get the below given result


How to remove calculated field temporarily 


Now we if we want to remove “Calculated Field” temporarily then we will simply click on pivot table and press “right click”, simply remove it by below highlighted box.


How to remove calculated field temporarily

If we want to remove “Calculated Field” permanently then we will follow the below given instruction:-

1.      Click on Pivot Table
2.      Go to Option Tab
3.      Click on Formula Button drop down arrow
4.      Click on Calculated Field
5.      Calculated Field box appear
6.       Click on the drop down arrow and look for field you want to delete
7.      And simply delete it or you can modify it also by click on modify button.


List of All the Calculated Fields

1.         Click anywhere in the Pivot Table
2.         Go to Formula tab drop down
3.         Select for "List of Formulas" and Click 


A new sheet will be generated in the workbook,  with a list of "Calculated Fields" and "Calculated Items"


Pivot Table has more feature with "Calculated Fields" and "Calculted Item" like "Problem with Calculted Fields" and "Calculated Items", we will discuss more about this feature in future blog.

Till then good bye

Narendra

Monday, 3 April 2017

Filtering Data in Pivot Table


The use of Pivot Tables are so common in offices now-a-days, so everyone must need to know all the trick of it because it is one of the power full tool.

So in this tutorial we will discuss about the Pivot Table filters. There are a lot off filters in Pivot
Table. We will discuss a few in this tutorial but if you follow all the tips  provided in this tutorial, you will become the master of Pivot Table Filters.

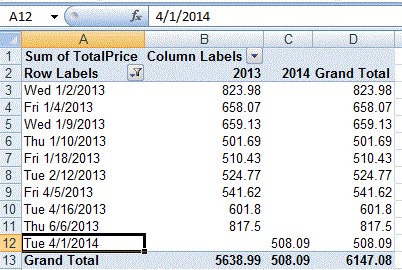
We will start the discussion from the below given Pivot Table image.


The above given data table is Pivot Table in which we have the data by date wise and we will apply some rules in this Pivot Table to get the result by our need.

1.  Top 10 Values from Given Pivot Table

Now we want Top 10 values from this Pivot Table because this is so lengthy, so what to do for that

simply put the cursor on "Row Labels" drop down menu and click and following image will appear


Click on "Row Labels" and then click on "Value Filters" another menu open and simply click on the last button "Top 10" when we click on "Top 10" button, following image will appear 


And simply click on "OK" button the following image will appear


And this is the result of "Top 10" values from the given Pivot Table Data.

This is the result of "Top 10 Data" and and by the same way if we need the result of "Top 5" or "Top ?" we will change the figure "5" in place of "10" and so on.

Now one more thing if we want to change the result by "Ascending or Descending" order we will follow the below given image instruction


Just put the cursor on Pivot Table data field and click on the "Oldest" and "Newest" button this is simply  A to Z or Z to A.


2. Filter Pivot Table for Bottom 10 Items

In the above example we discussed about "Top 10" items from Pivot Table and now we will discussed about "Bottom 10" items. This below given image will give you about the "Bottom 10" values in the Pivot Table.


3. Clear the Filters

Now in this topic we will learn that if we have applied for any kind of filter and we want to remove it to apply another filter so below given image will teach this thing.


Simply click on "Clear Filter From" button and if filter is applied then it will remove the filter and data will look as usual.

4. Mote  Filter Option

Now we will learn a little more about filtering in Pivot Table. As we learn that "Top 10", "Bottom 10", "Clear Filter" but this is not the end of Filter option in Pivot Table. There are some more filter in Pivot Table. Below given image will make it clear


When we click on "Row Label" drop down the above image will appear and then click "Value Filter" another menu will appear and there are  lot of option like "Equals", "Does Not Equals", "Greater Than" and so on...

And another image is for another filter option, first focus on below given image


In this image we will click on "Date Filter" a long list of filter option will appear like "Equal", "Before", "After" and so on.

There are multiple option of Pivot Table filter as we discussed in this tutorial . Filtering in Pivot Table is not difficult but to start doing this, it will become so easy to become expert.


Regards

Narendra

Featured post

Pivot Tables