Saturday, 12 December 2020

How to Move Sheets in Excel VBA


In this blog post, you will learn about how to move sheets “before” and “after” any particular sheet in Excel by VBA.


Here in the below image, you can see that there are multiple sheets inserted. Here we will move any sheet before and after to other sheets.

Now we will use these sheets to move from one place to another.


Move Sheet After Another


First of all, we will move the sheet My Data to after sheet Main.

Use the code below:-


“Sub Move_Sheet_Name()

Sheets("My Data").Move after:=Sheets("Main")

End Sub”


Write the above VBA code in a new module and execute the code by pressing “F8” again and again until End Sub.


See the below image, where we have successfully moved the sheet “My Data” from its place to after sheet Main.


Move Sheet Before Another

Now with the help of VBA macro, we will move sheet “New Data” before sheet Main.

Use the below VBA code.


“Sub Move_Sheet_Before()

Sheets("New Data").Move before:=Sheets("Main")

End Sub”


See the result in the below image:-


So in this blog post, you learned about how to move a sheet before or after any particular sheet.

I hope you find this blog post useful.

Please feel free to put your comments and suggestion in the below comment box.


Thanks

Narendra


Related Post

How to Insert a New Sheet In Excel VBA

What is Current Region Property in VBA

How to use Orientation in Excel VBA

Easiest Way to Copy and Paste Data in Excel VBA

How to Change the Background Color in Excel VBA

How to Change Font Color in Excel VBA

How to Change or Rename the Sheet Name in Excel VBA


Thursday, 10 December 2020

How to Change or Rename the Sheet Name in Excel VBA

Rename or Change Sheets


In this tutorial, we will learn about how to change or rename a sheet name in Excel VBA.

Here we can see that, there are four sheets are appearing in the below image.


In VBA, we have three methods to change or rename any of the sheets within a workbook.


First Method: Active Sheet Method


Using this method, we can change the name of an active sheet.


What is the Active Sheet?

Suppose that we are working in “Sheet1”, so in this case, our the active sheet is “Sheet1”.

Now with the help of VBA macro, we will change the active sheet name.

See the below VBA macro:-


Sub Change_Current_Sheet_Name()

ActiveSheet.Name = "Main_Dataset"

End Sub


Write the above code and run by pressing F8 for step by step execution.


This is our first method to rename or change the sheet name by VBA macro.


Using the Sheet Index or Number Method

In this method, we will rename or change the Sheet by its index or number.

Suppose that we want to change our sheet number 3, where Sheet3 name as Old_Data.

See the below VBA macro

Sub Rename_Sheet_By_IndexNumber()

Sheets(3).Name = "Old_Data"

End Sub


See Image Below:-


Third Method for Renaming Sheets by Using Sheet Name 

In this method, we will use a sheet name to change or rename sheets by VBA macro.

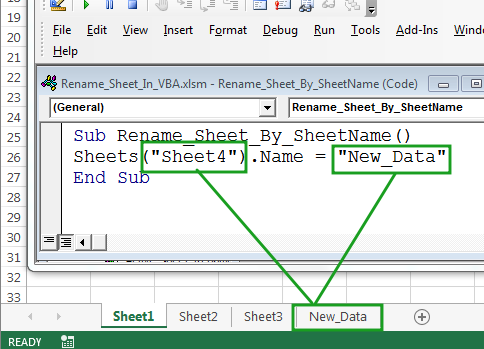
Now suppose that we want to change the name of Sheet4 with New_Data by VBA macro.


Use the below VBA code:-


Sub Rename_Sheet_By_SheetName()

Sheets("Sheet4").Name = "New_Data"

End Sub


So, these are the three methods to change or rename sheet names by VBA macros.

In this tutorial, you learned about how to change or rename sheets name in Excel VBA.

I hope you find this tutorial useful and helpful.

Please feel free to put your comments or suggestion in the below box.


Thanks

Narendra


Related Posts


How to Insert a New Sheet In Excel VBA

What is Current Region Property in VBA

How to use Orientation in Excel VBA

Easiest Way to Copy and Paste Data in Excel VBA

How to Change the Background Color in Excel VBA

How to Change Font Color in Excel VBA


Friday, 4 December 2020

How To Create A New Sheet with Name in VBA


In our previous blog post, you learned about how to insert a new sheet before and after from any particular sheet by VBA.


Now in this post, you will learn about how to insert a new sheet with name from VBA macro. 

Here we are going to use the following code:-


Sub insert_new_sheet_with_name()

Sheets.Add.Name = "My Data"

End Sub


In the below image, you can see how this macro works.

When we execute this macro, our new sheet “My Data” added, see in the image below.


This one is the first method to insert a new sheet by VBA.


How To Insert A New Sheet With Name By Cell Range


In this method, you will learn about how to insert a new sheet by a cell value.

See in the below image, we have a cell value as “Excelnsg” in range (“A1”).

See in the below image-


Now we will create a new sheet in Excel by giving a name from the cell value.


Our sheet name is “Main” where our range “A1” has a value as “Excelnsg”.


Now we will use the following code to insert a new sheet with the name from a cell.


Sub insert_new_sheet_with_name_2()

Sheets.Add.Name = Range("A1").Value

End Sub


Write the above code in the VBA module and press 'F5' to execute the code and see the result in the below image.


After executing the code, see the result in the above picture. A new sheet with named as 'Range("A1") which is 'Excelnsg'.


So you learn, how to insert a new sheet in Excel with name by VBA macro.


I hope you find this tutorial useful.


Please feel free to post your comment and suggestion in the comment box below.

Thanks

Narendra.


Related Post


Sunday, 29 November 2020

How to Insert a New Sheet In Excel VBA


In his blog post, you will learn to insert a new sheet or worksheet in Excel by VBA.


There are multiple ways to insert a new sheet in Excel.


First Method: 


Right-click on the sheet tab and choose the ‘insert’ option and then select the desired sheet type, whether a blank or different one.


See the image below:-


Second Method

Go to the “Home tab and select the ‘Cells’ group, click ‘Insert’ drop down and click on ‘Insert Sheet’. 

Third Method

Use shortcut key ‘Shft+F11’ to insert a new sheet.

Now, we will learn to insert or add a new sheet with the help of VBA macro.


In VBA, there are two methods to insert or add new sheets.


The first method to add a new sheet


The second method to add a new sheet


These are the two methods to insert or add a new sheet in Excel by VBA.

But by default, the sheet will be inserted or add just before the current sheet location.

Three sheets are appearing in the image below:-


Here, we will insert a new sheet before and after sheet “Main” to understand the concept in a better way.

In VBA, if we are going to insert a new sheet, then we need to give its location (such as previous or after) along with inserting a new sheet code.

Now here we want to insert a new sheet before sheet “Main” then our VBA macro will be as appears in the below image.


´


See the macro in the image and see that we have added Sheet7 before sheet Main.


Now we will insert a new sheet after sheet “Main” then our VBA code will be as seen in the below image:-


Here in the above image, you can see the sheet Sheet8 is inserted after sheet Main.


So in this tutorial, we learned how to insert a new sheet in VBA and how to insert a new sheet with its location. 


I hope you find this tutorial useful.

Please feel free to put your comments and suggestion regarding the above topic.

Thanks

Narendra


Monday, 23 November 2020

What is Current Region Property in VBA


In this blog post, you will learn about CurrentRegion Property in Excel VBA.

CurrentRegion Property is useful when our dataset is continuously expanding. This property never asks to assign a whole range of datasets but a single cell reference from it.


What is the Current Region - Definition


The CurrentRegion is a range bounded by any combination of blank rows and black columns.

We will learn the current region property with the help of the below-given examples.

Suppose that we have a dataset, as shown in the image below:-


Now we will select or copy this image with the following VBA code.

Range (“A1:A10”).Select (for selecting the whole range from A1 to A10).


And for copying the above range:-

 Range(“A1:A10”).Copy (for copying the whole range from A1 to A10)


We can also select this dataset with the help of CurrentRegion property, see in the below image:-


You can see in the below image example that we took only single-cell reference for selecting the whole dataset.


These are the methods to copy and select the dataset for a single column dataset.

Now suppose that we expand our dataset up to (“A1:C10”), see in the below image:-


Now we will select the dataset again in the same way. 

For selecting and copying the above dataset, we will use the following VBA code:-


For Copying the dataset


Here you can see that we are using the range from "A1:C10".

But when we select or copy the above dataset with the CurrentRegion property, we do not mention the whole dataset range.


Current Region property is useful when we are working on expanding dataset.

By using the CurrentRegion property, we know that referring to a single cell can select or copy the whole range of the dataset.

But this property is not going to work if there is a blank row and column is existing within the dataset.

Now we will use the current region property to select or copy the below-given dataset.


In the below image, we use CurrentRregion property to copy the dataset, as you know that this property does not require to assign any range.

The whole dataset is divide into four parts because blank row and column.

We can see that only dataset which is beyond the blank row and the column is not selected or copied.

We can understand here the CurrentRegion property in the multiple examples as mentioned below.


The below dataset contains one blank row and a blank column, and with the help of this dataset, I want to explain that the definition of the CurrentRegion property, i.e how this property works/


Image -01

In the "Image-01" you can see that the CurrentRegion property not selecting or copying the dataset which is after the blank row and column.


 You can see in the below images, the CurrentRegion property is not doing anything with the dataset which is beyond the blank rows and blank columns.


Image - 02


Image - 03


Image - 04


So with the help of all these examples, I tried to explain the CurrentRegion property in a detailed way.


I hope you find this tutorial useful.


Please feel free to put your comments or suggestion into the below box


Thanks

Narendra

Tuesday, 2 June 2020

How to use Orientation in Excel VBA

In this blog post, you will learn about “How to apply Orientation in Excel VBA”.


In this blog post, you will learn about “How to apply Orientation in Excel VBA”.

First of all, we need to know what is Orientation in Excel, so ‘Orientation’ is nothing but “aligning or rotating our text data in a cell”.

See the image below:-


See in the above image, our text data is rotating in 4 different direction.

In this post, you will learn more VBA option to rotate or align our text data.

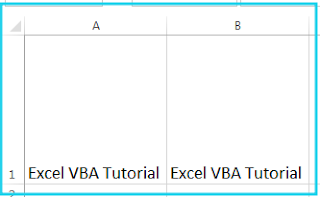
I am using the below image as the text data:-


Orientation


Our first option to rotate the text data from bottom to upward.

Option 01:- xlUpward


Code: -           Range ("A1:B1").Orientation = xlUpward

This code rotates our whole dataset from bottom to upward.


Option 02:- xlDownward

Code:- Range ("A1:B1").Orientation = xlDownward

This code will rotate our text data from upward to downward


Option 03:- xlVertical

Code:- Range ("A1:B1").Orientation = xlVertical

This code turns our whole dataset as vertical


Option 04:- xlHorizontal

This code will turn our whole dataset as horizontal

Code: - Range ("A1:B1").Orientation = xlHorizontal


Option 05:- Orientation = 30 (Degree)

This code will rotate our text data up to a 30-degree angle.

Code: - Range ("A1:B1").Orientation = 30


Option 06:- Orientation = 60 (Degree)

This code will rotate our text data up to a 60-degree angle.

Code: - Range ("A1:B1").Orientation = 60


Option 07:- Orientation = 90 (Degree)

This code will rotate our text data up to (90) degree angle.

Code: - Range ("A1:B1").Orientation = 90


Option 08:- Orientation = -90 (Degree)

This code will rotate our text data up to (-90) degree angle.

Code: - Range ("A1:B1").Orientation = -90


Option 09:- Orientation = 0 (Degree)

This code will rotate our text data up to (0) degree or Horizontal.

Code: - Range ("A1:B1").Orientation = 0


I hope you like this post.


Please feel free to put your comments below.


Regards


How to Change Font Color in Excel VBA

How to Change the Background Color in Excel VBA

Easiest Way to Copy and Paste Data in Excel VBA

How to Apply Border Style and Thickness in Excel VBA
How to Clear Cell Formatting in Excel VBA

Text Alignment in Excel VBA


Featured post

Pivot Tables

Pivot Tables are one of the most useful tool in excel, and most excel experts says that this tool is the magic tool for quickly prepar...